How do I create and import a Questionnaire using an Excel file?
What's the issue you're facing?
I would like to create and/or import a questionnaire into my event using Excel. How would I do this?
Solution
In Sourcing Dojo or Supplier Onboarding you can create a questionnaire different ways:
- From scratch, adding the questions one by one manually to your questionnaire,
- You can add a previously saved questionnaire from the library (if you saved one before),
- You can import a batch of questions using an Excel file.
- From scratch, adding the questions one by one manually to your questionnaire,
- You can add a previously saved questionnaire from the library (if you saved one before),
- You can import a batch of questions using an Excel file.
This walkthrough explains this last option.
If you already have an existing list of questions that you would like to import, or if you are working with a subject matter expert who would be creating or reviewing the questions of your event for example, it can be a useful option to use the Excel import feature when creating a questionnaire in Sourcing Dojo.
How it works:
When creating a questionnaire, instead of clicking on “+ New Questionnaire” button, select the “Download” option. This downloads an Excel template, where you can add all the questions and import them together by uploading this file.
1) Download the Excel template.
2) Open the file.* On the first tab, you see the instructions on how to use the file. The second tab shows you existing information on the questionnaire. Move to tab 3 to start.
Important: DO NOT edit the first two tabs.* Note: in order to start editing, you might have to click on the “Enable Editing” button first – this depends on your computer settings, most often files downloaded from the internet are opened read-only Protected mode at first.
3) This sheet shows the structure of the questionnaire and how information should be added, row by row. Depending on the settings you selected, the structure might be more complex (for example additional columns for scoring and weighting).
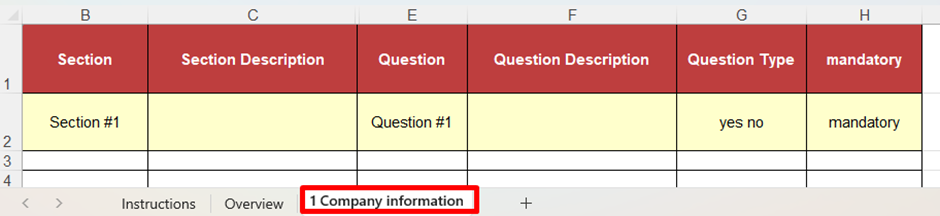
The first row marked with yellow shows you an example. You can either overwrite the information in this row or you can delete it, otherwise this content will be imported as the first question.
Important: DO NOT change the text in the column headings and DO NOT add any new columns.
4) Add the questions row-by-row, following the below structure.
Section (not mandatory): The questions in the questionnaire can be grouped into different sections. You can have as many sections as you need. In this column you can name the section the question should belong to. If this cell is left blank, the questions will belong to same one section.
For example, your first section can be called “Company details”, and each question that belongs to this section must have “Company details” in this column.
Section Description (not mandatory): If you want your section to display a description, you can add it here.
For example, for the “Company Details” section, you can add “Key information and details about your company” in this cell.
For example, for the “Company Details” section, you can add “Key information and details about your company” in this cell.
Question (mandatory): Add the question into this column that you would like to be displayed.
For example, for the “Company Details” section, this can be “Full company name”.
For example, for the “Company Details” section, this can be “Full company name”.
Question Description (not mandatory): If the question requires any clarification or explanation, you can add it here.
For example, for the “Full company name” question, an explanation is added such as “Please add here the full, legal name of your company”.
For example, for the “Full company name” question, an explanation is added such as “Please add here the full, legal name of your company”.
Question Type (mandatory): Here you can select from a picklist what type of answer you require. You can select the answer to be yes/no, pick one from the list, multiple choice, one line or paragraph text, document upload, date, a table or numeric values.
Important: if you select Picklist or Multiple choice, you can specify the list or multiple-choice items once you imported the questions, in the platform.For example, for the “Full company name” question, “one line text” is selected as the answer should not be longer than several words.
Mandatory (not mandatory): In this column you can select if the question should be mandatory or not. If the cell is left blank, the question will not be mandatory. Otherwise add “mandatory” or “yes”. For example, for the “Full company name” question, this question is marked mandatory as each supplier must provide this information.
Important: when filling out this type of template, be aware that there is a hidden column between Section Description (column C) and Question (column E), which should not be overwritten as it contains important data for the import.
5) Once you added all the required questions, save the Excel file, then go back to the platform and click on the “Upload” button and select the file.
6) When the questions are loaded, check to make sure all information was imported correctly, and no details are missing. If anything needs changing, you can click on the “Edit question attributes” button to change the question. If the questions need to be re-ordered, you can drag and drop them to change their order.
If your questionnaire has scoring or weighting:
In this case your Excel template has further columns to capture these additional details.
Depending on the settings, whether the weighting is calculated per section, per question or both per section and question, you might see additional column for section weighting, scoring criteria, maximum score and question weighting.
As for the weighting which is expressed in percentage, the units (whether per section, per question or both) weighted must total up to a 100.
- So if the questions are weighted, their individual weights must add up to a 100. For example, in case of 5 questions, their weighting it could be 20, 10, 15, 25, 30, totalling a 100.
Or see the example below, on how the question weights add up to 100 per section:
Or see the example below, on how the question weights add up to 100 per section:
- If the sections are weighted, then the weights of all individual sections within the questionnaire must add up to 100.
In case of scoring, there is no such rule. In the relevant column, enter the maximum possible score for the question (column titled “Out of”), and there is a column to add the scoring criteria for each question too.
Important: when filling out this type of template, be aware that there is a hidden column between Score Weighting (column D) and Question (column F), which should not be overwritten as it contains important data for the import.
Some common issues that results in a failed import:
- Text too long: section titles and questions can be up to 255 characters long. If they are longer, the import will fail.
- Template structure is changed: if any column is deleted, renamed, reorganised or new column is added, the import will fail.
- Weighting: if the weights of the questions and sections don’t add up to 100, the import will fail.
- Content overwritten in hidden columns: download a new template and copy the questions from the previous Excel file carefully, so that the hidden columns are not overwritten.
Related Articles
How do I start creating my questionnaires once they have been added to my Supplier Onboarding event?
What is the issue you're facing? I have added my questionnaires to my Supplier Onboarding event, but now I need to start creating them. How do I do this? Solution Within Market Dojo there are 3 ways to build a questionnaire: Within the application by ...How to auto-generate questions using AI
What is the issue you're facing? I would like to create questions in in questionnaire, but would like to use AI to do this. How do I do it? Solution Once you have created your questionnaire you will then need to create questions as part of this. To ...How to create a new custom Column within your Participant Summary using custom fields
What is the issue you're facing? I am trying to add a new custom column to my Onboarding participant summary using an existing custom field. How can I do this? Solution To create a new custom column you will need to have made custom fields first. If ...I have submitted my questionnaire but need to make a change, how do I do this?
What is the issue you're facing? I have submitted answers to my questionnaires, but I need to change something. How can I do this? Solution If you have submitted your questionnaire you are currently unable to make any changes to this. Please use the ...How do I create my questions within my questionnaire?
What is the issue you're facing? I have added my questionnaires and started creating them, how do I now add my questions manually? Solution Please see the article below which details how to manually setup your questions and sections within your ...